

Real-time applications are everywhere. Messaging apps update instantly, ride-sharing apps show live driver locations, and dashboards refresh without reloading the page.
If you are a Laravel developer, adding real-time functionality used to mean relying on third-party services like Pusher. But now, Laravel has its own built-in WebSocket server called Laravel Reverb.
In this beginner-friendly tutorial, you will learn how to build a simple real-time notification system using:
- Laravel
- Laravel Reverb
- Laravel Echo
- Tailwind CSS
- Blade templates
By the end, you’ll understand how Laravel broadcasting works and how to update your UI instantly without refreshing the page.
What is Laravel Reverb?
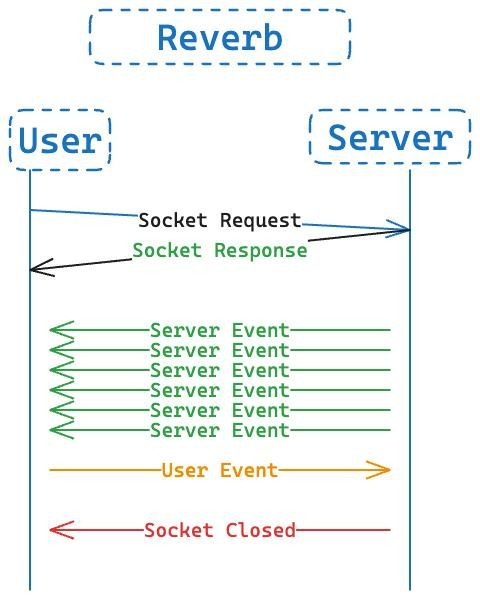
Laravel Reverb is Laravel’s official WebSocket server for real-time communication.
Instead of polling your server every few seconds, ask:
“Do you have updates?”
Reverb allows your app to instantly push updates to connected users.
Examples of where Reverb is useful:
- Real-time chat
- Notifications
- Live dashboards
- Ride tracking
- Order tracking
- Multiplayer apps
- Activity feeds
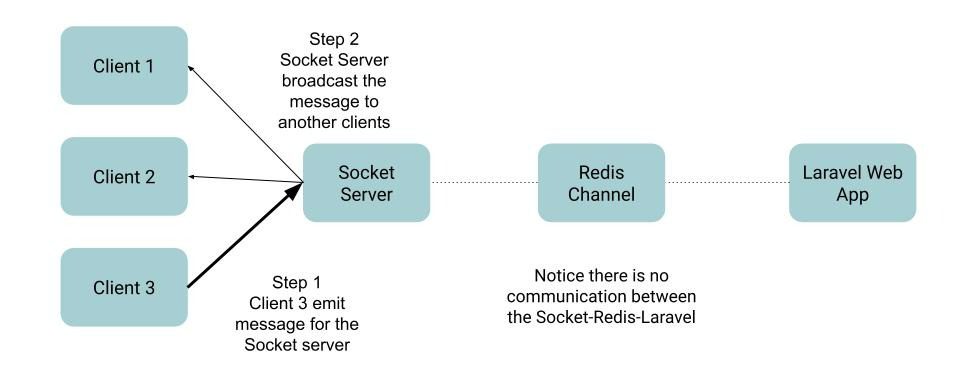
Think of Reverb as a bridge between your backend and frontend.
When something happens in Laravel (for example, a new message arrives), Reverb immediately broadcasts it to connected users.
Why Use Laravel Reverb?
Before Reverb, many Laravel developers used Pusher.
The problem?
Pusher is a third-party service and may become expensive at scale.
Reverb gives you:
✅ First-party Laravel support
✅ No third-party dependency
✅ Self-hosted WebSocket server
✅ Better control over infrastructure
✅ Seamless Laravel integration
For many projects, Reverb feels like “Laravel-native real-time.”
How Laravel Broadcasting Works
Before writing code, let’s understand the flow.
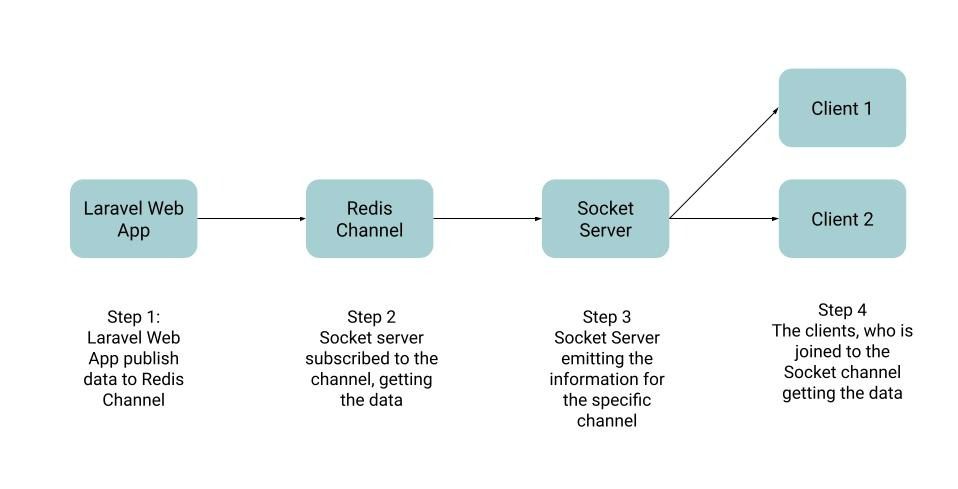
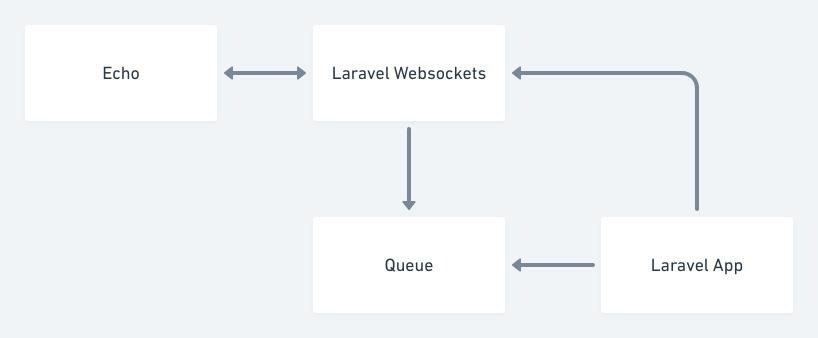
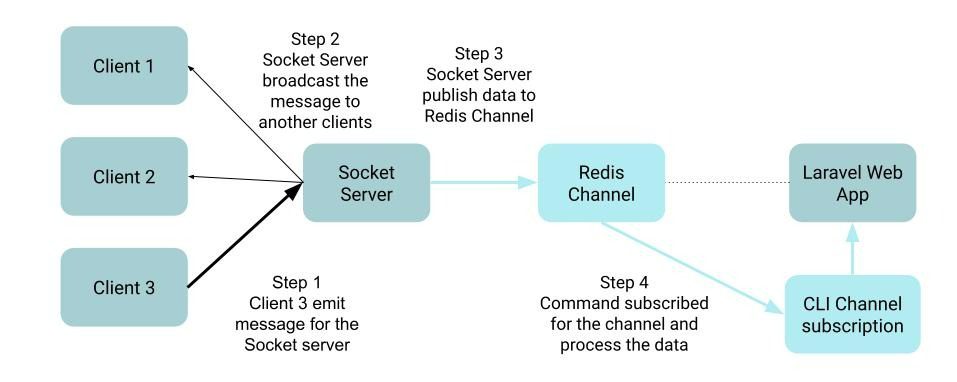
The process looks like this:
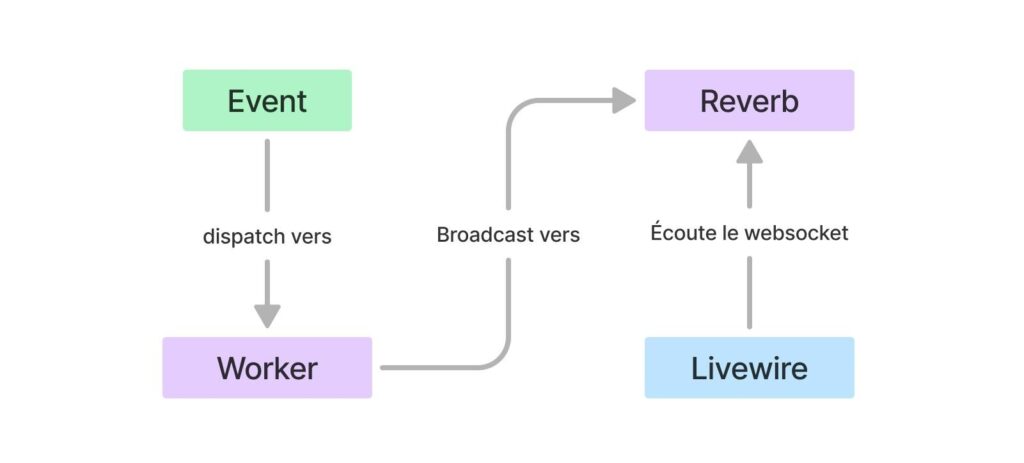
- A user performs an action (button click, form submission)
- Laravel fires an event
- The event is broadcast through Reverb
- Laravel Echo listens on the frontend
- Blade updates instantly
Example:
User clicks “Send Notification”
↓
Laravel Event Fired
↓
Reverb Broadcasts Event
↓
Echo Receives Event
↓
UI Updates Automatically
Prerequisites
Before starting, make sure you have:
- PHP 8.2+
- Composer
- Node.js
- npm
- A fresh Laravel project
You should already know:
- Basic Laravel routing
- Controllers
- Blade templates
Step 1: Create a Laravel Project
Create a fresh Laravel app:
composer create-project laravel/laravel reverb-demo
cd reverb-demo
Run the project:
php artisan serve
Step 2: Install Laravel Reverb
Install Reverb:
php artisan install:broadcasting
Laravel will ask:
Which broadcasting driver would you like to use?
Choose:
reverb
Laravel will automatically:
- Install Reverb
- Configure broadcasting
- Install Echo
- Update frontend dependencies
You should now see:
BROADCAST_CONNECTION=reverb
Step 3: Configure Environment Variables
Open your .env file.
Add:
BROADCAST_CONNECTION=reverb
REVERB_APP_ID=app-id
REVERB_APP_KEY=app-key
REVERB_APP_SECRET=app-secret
REVERB_HOST=”127.0.0.1″
REVERB_PORT=8080
REVERB_SCHEME=http
These values are used by your WebSocket server.
For local development, the defaults are fine.
Step 4: Start Reverb Server
Run:
php artisan reverb:start
You should see something like:
Starting server on 0.0.0.0:8080
Keep this terminal running.
Reverb works similarly to queue workers — it needs a running process.
Step 5: Create an Event
We’ll build a simple real-time notification system.
Generate an event:
php artisan make:event NewNotification
Open:
app/Events/NewNotification.php
Update it:
<?php
namespace App\Events;
use Illuminate\Broadcasting\Channel;
use Illuminate\Contracts\Broadcasting\ShouldBroadcast;
class NewNotification implements ShouldBroadcast
{
public string $message;
public function __construct($message)
{
$this->message = $message;
}
public function broadcastOn(): array
{
return [
new Channel(‘notifications’)
];
}
}
What’s happening here?
ShouldBroadcast
This tells Laravel:
“Broadcast this event in real time.”
broadcastOn()
Defines the channel users listen to.
We created:
notifications
Step 6: Create a Route to Trigger Event
Open:
routes/web.php
Add:
use App\Events\NewNotification;
use Illuminate\Http\Request;
Route::view(‘/’, ‘welcome’);
Route::post(‘/notify’, function (Request $request) {
broadcast(new NewNotification(
$request->message
));
return response()->json([
‘success’ => true
]);
});
Whenever this route runs, a broadcast happens instantly.
Step 7: Configure Echo
Open:
resources/js/bootstrap.js
You should already see Reverb config.
It may look like:
import Echo from ‘laravel-echo’;
import Pusher from ‘pusher-js’;
window.Pusher = Pusher;
window.Echo = new Echo({
broadcaster: ‘reverb’,
key: import.meta.env.VITE_REVERB_APP_KEY,
wsHost: import.meta.env.VITE_REVERB_HOST,
wsPort: import.meta.env.VITE_REVERB_PORT,
wssPort: import.meta.env.VITE_REVERB_PORT,
forceTLS: false,
enabledTransports: [‘ws’, ‘wss’],
});
This creates a connection between frontend and Reverb.
Step 8: Create a Blade UI with Tailwind
Open:
resources/views/welcome.blade.php
Replace everything:
<!DOCTYPE html>
<html>
<head>
<title>Laravel Reverb Tutorial</title>
@vite([‘resources/css/app.css’, ‘resources/js/app.js’])
</head>
<body class=”bg-gray-100 min-h-screen”>
<div class=”max-w-xl mx-auto py-20 px-6″>
<div class=”bg-white rounded-xl shadow p-6″>
<h1 class=”text-3xl font-bold mb-6″>
Laravel Reverb Notifications
</h1>
<input
id=”message”
type=”text”
placeholder=”Enter message”
class=”w-full border rounded-lg p-3″
>
<button
id=”sendBtn”
class=”bg-blue-600 text-white px-5 py-3 rounded-lg mt-4″
>
Send Notification
</button>
<div
id=”notifications”
class=”mt-6 space-y-2″
></div>
</div>
</div>
</body>
</html>
We built a simple UI using Tailwind.
Users can:
- Type a message
- Click a button
- Receive real-time updates instantly
Step 9: Listen for Events in Blade
Inside the same Blade file, before </body>:
<script type=”module”>
document
.getElementById(‘sendBtn’)
.addEventListener(‘click’, async () => {
const message =
document.getElementById(‘message’).value;
await fetch(‘/notify’, {
method: ‘POST’,
headers: {
‘Content-Type’: ‘application/json’,
‘X-CSRF-TOKEN’:
‘{{ csrf_token() }}’
},
body: JSON.stringify({
message
})
});
});
window.Echo
.channel(‘notifications’)
.listen(‘NewNotification’, (event) => {
document
.getElementById(‘notifications’)
.insertAdjacentHTML(
‘afterbegin’,
`
<div class=”bg-green-100 p-4 rounded-lg”>
${event.message}
</div>
`
);
});
</script>
Here is what happens:
Echo → listens on notifications channel
↓
NewNotification event arrives
↓
JavaScript updates HTML instantly
No page refresh.
No polling.
Pure real-time.
Step 10: Run Everything
Terminal 1:
php artisan serve
Terminal 2:
npm run dev
Terminal 3:
php artisan reverb:start
Open:
http://127.0.0.1:8000
Now:
- Type a message
- Click Send Notification
- Watch the UI update instantly
Open two browser tabs to really see the magic.
Both tabs update in real time.
Common Beginner Mistakes
1. Forgetting to Start Reverb
If nothing works:
php artisan reverb:start
must be running.
2. Forgetting npm run dev
Vite powers your frontend.
Without:
npm run dev
Echo may not load.
3. Wrong .env Config
Check:
BROADCAST_CONNECTION=reverb
and:
VITE_REVERB_APP_KEY=”${REVERB_APP_KEY}”
VITE_REVERB_HOST=”${REVERB_HOST}”
VITE_REVERB_PORT=”${REVERB_PORT}”
4. Browser Console Errors
Open DevTools.
Look for:
WebSocket connection failed
Usually this means:
- Reverb server not running
- Wrong host
- Wrong port
When Should You Use Reverb?
Use Reverb when you need:
- Chat systems
- Ride tracking
- Real-time notifications
- Delivery updates
- Live dashboards
- Admin activity streams
For example, in a Bolt-style app:
Driver accepts trip
↓
Broadcast event
↓
Passenger sees update instantly
Perfect use case.
Final Thoughts
Laravel Reverb makes real-time features significantly easier for Laravel developers.
Instead of juggling third-party services, you can stay fully inside the Laravel ecosystem.
In this tutorial, you learned:
- What Reverb is
- How broadcasting works
- How to install Reverb
- How to create events
- How to listen using Echo
- How to update Blade UI in real time with Tailwind
Once you understand this workflow, you can build much more advanced features like:
- Real-time chat
- Ride request systems
- Online presence indicators
- Typing indicators
- Live admin dashboards
- Order tracking systems
The best way to learn Reverb is simple:
Build something real-time and experiment.